When you have finished the installation of your WordPress website, it generally comes with a default theme. This default theme is quite minimalistic and you might want to change it. A lot of new people with WordPress don’t know “how install WordPress theme”.

You understand that know how to install a new WordPress Theme is very important if you want to stand out from other websites and build your brand image.
It’s a very simple task and we are going to learn how to do it.
How to install a WordPress theme step by step
Install WordPress themes from the dashboard
Install a theme from the dashboard is probably the most natural way to do it with the WordPress Framework.
1. Log in to the admin dashboard
First access to your WordPress admin backend by typing /wp-admin or /wp-login.php at the end of your URL (ex: http://www.yourwebsite.com/wp-admin).

Once logged, go to Appearance > Theme.

A new window will open, with a list of your current themes.
3.a Install a Free Theme
Click on Add New, near the Themes page’s title.

You will be able to search and select a theme into the Free themes directory.

To install a Free theme, you just have to click on Install.
3.b Upload a Theme
If you want to upload a premium theme that you bought on ThemeForest or else, you can also do it.
Click on Upload Theme.

Browse the zip file of your theme on your computer, then click on “Install Now”.

Once your theme installed, don’t forget to activate it.
Installing WordPress themes manually
If for some reason, you can’t install your theme from the dashboard, you might be able to install it manually.
It’s generally happened when your web hosting doesn’t allow you to do it or when you have set the wrong permissions on your folders…
You will need to upload it via File Transfert Protocol (FTP).
For most common web hosting providers, you should be able to find your FTP account information (login and password) via their administration panel.
If not, you should consider to change and go with some provider like Kinsta, or build your own VPS with Vultr or else.
1. Login with your FTP account
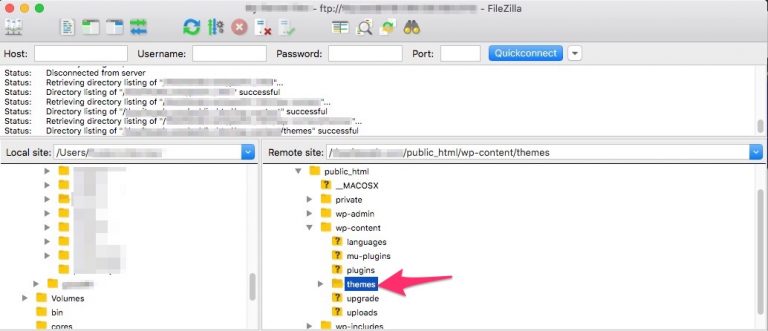
Install an FTP client software (like Filezilla) on your computer then log in with your FTP account.
2. Prepare your theme
Beforehand, you will need to unzip the theme zip file.
3. Upload the theme via FTP
Once you get a folder with the theme name.
Upload the theme by drag and drop the entire folder under your WordPress’ wp-content/theme/ folder.

It should take a few time until the whole folder is uploaded.
4. Activate your theme
When the upload is complete, don’t forget to activate the theme via the WordPress dashboard.
That’s all for that tutorial, now you know how to install a WordPress theme!


Thanks for this useful tutorial. I also want to mention, that after installing a WordPress them, it is important to configure such things as breadcrumbs, title tags(h1, h2) and other important parts of theme.